
Welcome to the world of Wing Chun! If you’re a guy who’s into martial arts, you’ve probably heard of Wing Chun—a dynamic and practical style known for its efficiency and directness.
One of the essential tools for honing your Wing Chun skills is the Wing Chun dummy.
So, what’s the big deal about this wooden contraption? Well, think of it as your silent training partner, always ready to help you perfect your techniques.
Whether you’re a seasoned practitioner or just starting out on your Wing Chun journey, incorporating a Wing Chun dummy into your training routine can take your skills to the next level.
In this guide, we’re going to dive into the world of Wing Chun dummies and show you how to make one from scratch. But before we get into the nitty-gritty of construction, let’s take a quick look at why training with a Wing Chun dummy is such a game-changer.

Benefits of Using a Wing Chun Dummy
Wing Chun practitioners swear by the effectiveness of training with a Wing Chun dummy, and for good reason. Let’s take a closer look at some of the key benefits:
1. Precision and Technique Enhancement
In the world of Wing Chun, precision is everything. Every strike, block, and deflection must be executed with pinpoint accuracy to outmaneuver opponents effectively.
The Wing Chun dummy serves as the perfect training partner, offering a stable and consistent target for practitioners to refine their techniques.
By repeatedly practicing strikes, traps, and redirects on the dummy, practitioners can develop a keen sense of timing and distance, ensuring that their movements are executed with surgical precision.
2. Muscle Memory Development
They say practice makes perfect, and nowhere is this more evident than in martial arts training.
Wing Chun relies heavily on muscle memory—the ability to perform techniques instinctively and without conscious thought. Training with a Wing Chun dummy allows practitioners to drill techniques repeatedly until they become second nature.
Whether it’s a chain of punches, a series of deflections, or a combination of both, the dummy provides a consistent platform for practitioners to ingrain these movements into their muscle memory.
This muscle memory is invaluable in real-world combat situations, where split-second reactions can mean the difference between victory and defeat.
3. Versatility in Training
One of the greatest advantages of the Wing Chun dummy is its versatility. Unlike traditional heavy bags or sparring partners, the dummy can simulate a wide range of opponents and scenarios.
Its adjustable arms and rotating body allow practitioners to practice techniques from various angles, heights, and distances.
Whether you’re working on close-range trapping techniques or long-range kicks, the Wing Chun dummy can adapt to meet your training needs. This versatility makes it an essential tool for both beginners looking to master the basics and advanced practitioners striving to perfect their techniques.
4. Solo Training Convenience
While partner drills and sparring are essential components of Wing Chun training, solo practice is equally important.
The Wing Chun dummy allows practitioners to train anytime, anywhere, without the need for a training partner. Whether you’re at home, in the gym, or even outdoors, you can always rely on the dummy to provide a challenging workout.
This convenience makes it easier to stay consistent with your training and progress at your own pace, even when life gets busy.
My efficiency and training went through the roof once I installed one of these in my garage. 30 minutes a day practice improved my joints, strengthened my senses and just raised my game all round.
Overview of Wing Chun Dummy Components
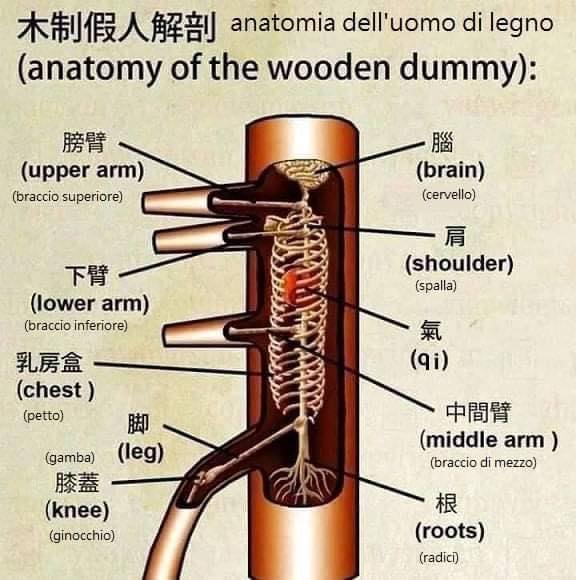
The Wing Chun dummy, also known as the Muk Yan Jong, is a traditional training apparatus designed to simulate an opponent’s arms and torso.
While there are variations in design, most Wing Chun dummies consist of several key components that serve specific training purposes.
Let’s explore each component in detail:
1. Main Body
At the heart of the Wing Chun dummy is its main body, typically made of hardwood such as oak or teak. The main body is cylindrical in shape and serves as the central support structure for the entire dummy. It is usually mounted vertically on a stand or frame, allowing practitioners to practice techniques at various heights.
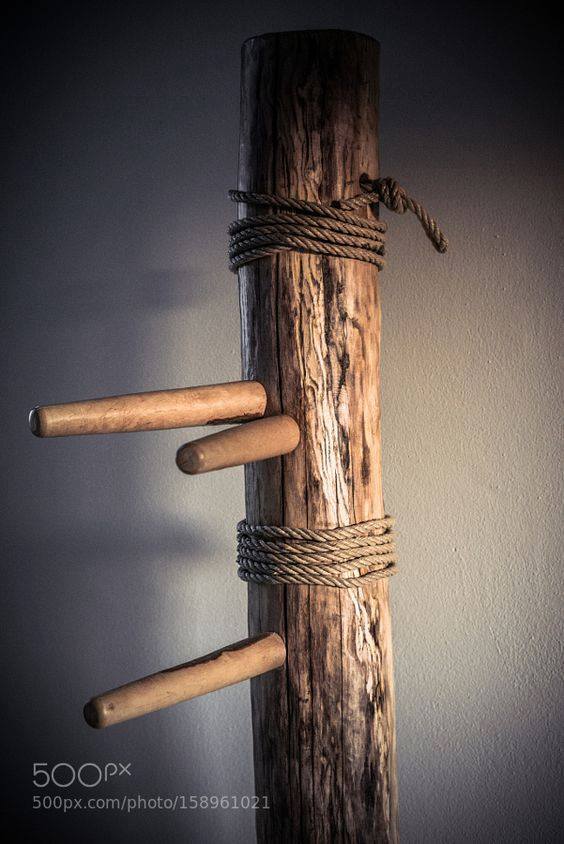
2. Arms
The arms of the Wing Chun dummy are perhaps its most recognizable feature. Traditionally made of wood, the arms extend horizontally from the main body at shoulder height, mimicking the position of an opponent’s arms in combat. The arms are positioned at specific angles to represent common striking and trapping positions in Wing Chun.
3. Legs
Some Wing Chun dummies also feature leg components, which extend downward from the main body to simulate lower body targets. These legs are typically positioned at the same height as the practitioner’s legs, allowing for the practice of low kicks, sweeps, and footwork techniques.
4. Centerline
It took me a few years to really understand what the centerline in wing chun was and how it all operated. The centerline is a critical concept in Wing Chun, referring to an imaginary line that runs down the center of the practitioner’s body.
Many Wing Chun dummies feature a centerline marker on the main body, allowing practitioners to visually reference this important concept during training. By aligning their strikes and defenses with the centerline, practitioners can maximize their efficiency and effectiveness in combat.
5. Additional Features
Depending on the design and manufacturer, Wing Chun dummies may include additional features such as spring-loaded arms, adjustable height and angle settings, and padded striking surfaces. These features can enhance the versatility and functionality of the dummy, allowing practitioners to customize their training experience to suit their specific needs and preferences.
Materials and Tools Needed
Now before i continue i must confess, when i first decided i wanted a dummy in my home – I was going to build it. But after 2 months of prep, I gave up and bought one instead.
(this is how mine turned out LOL)
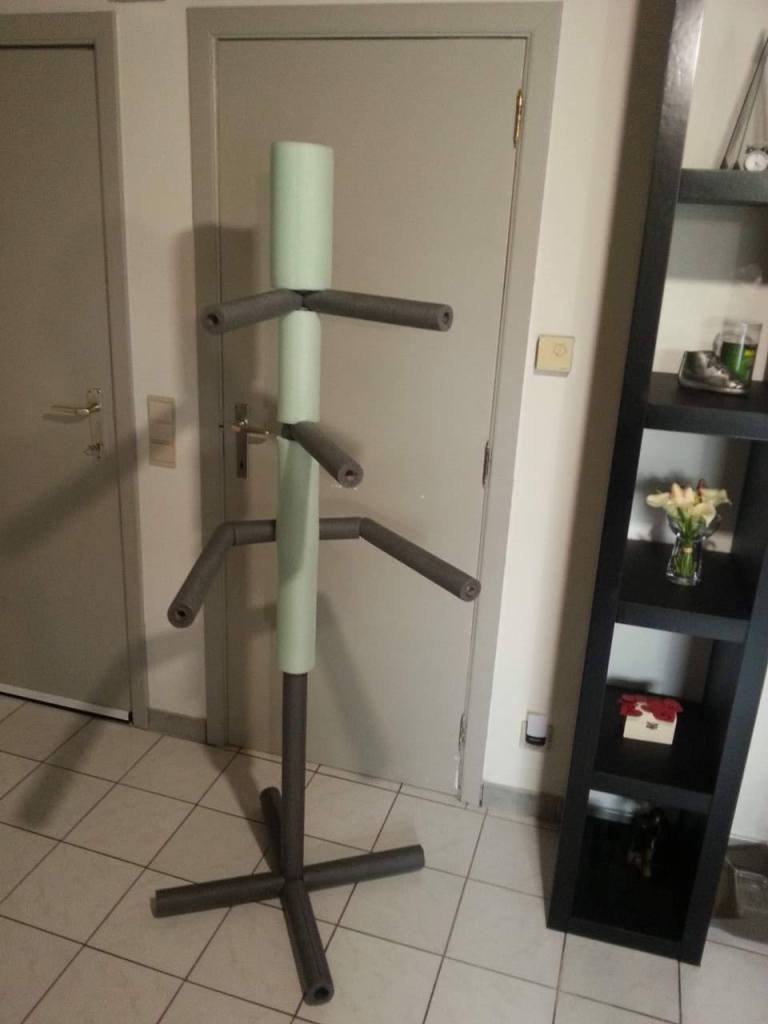
But a Danny my friend built his from scratch and gave the list of materials and tools he used which is what im sharing with you below.
Before you go on the journey of building your very own Wing Chun dummy, first you have to gather the materials and tools.
While the specific materials and tools may vary depending on your chosen design and construction method, here’s a general list to get you started:
Materials:
- Wood: Selecting the right type of wood is crucial for building a sturdy and durable Wing Chun dummy. Hardwoods such as oak, teak, or maple are commonly used due to their strength and resistance to damage.
- PVC Pipe or Metal Rods: These will be used to construct the arms and legs of the dummy. PVC pipe is lightweight and easy to work with, while metal rods offer added durability and stability.
- Fasteners: You’ll need screws, bolts, or dowels to securely attach the various components of the dummy together.
- Padding (Optional): If you prefer a padded striking surface for the arms and legs of the dummy, you’ll need foam padding or other cushioning materials.
- Centerline Marker (Optional): To mark the centerline on the main body of the dummy, you can use a contrasting paint or tape.
Tools:
- Saw: A saw will be necessary for cutting the wood and PVC pipe to the desired lengths.
- Drill: You’ll need a drill to create holes for the fasteners and attachments.
- Screwdriver or Wrench: Depending on the type of fasteners used, you’ll need a screwdriver or wrench to tighten them securely.
- Sandpaper or Sander: Sanding the wood and PVC pipe will help smooth out any rough edges and ensure a clean finish.
- Measuring Tape or Ruler: Accurate measurements are essential for ensuring that the components of the dummy are aligned properly.
- Paint or Stain (Optional): If you want to add a finishing touch to your Wing Chun dummy, you can use paint or stain to enhance its appearance and protect the wood from damage.
- Safety Gear: Don’t forget to wear safety goggles and gloves while working with tools and materials to protect yourself from injury.
Step-by-Step Guide to Making a Wing Chun Dummy
Now that you have all the necessary materials and tools, it’s time to roll up your sleeves and start building your very own Wing Chun dummy 🙂
Follow these step-by-step instructions to create your safe but effective dummy:
1. Prepare the Main Body:
1.1. Begin by selecting a suitable piece of hardwood for the main body of the dummy. Oak, teak, or maple are popular choices due to their strength and durability.
1.2. Using a saw, cut the wood to the desired length, typically around 6 feet for the main body.
1.3. Sand the wood to smooth out any rough edges and create a clean surface for painting or staining.
2. Construct the Arms:
2.1. Cut the PVC pipe or metal rods to the desired lengths for the arms, typically around 12-16 inches.
2.2. Drill holes in the main body of the dummy at shoulder height, spaced evenly apart to accommodate the arms.
2.3. Insert the PVC pipe or metal rods into the holes and secure them with screws, bolts, or dowels.
3. Add the Legs (Optional):
3.1. If you choose to include legs on your Wing Chun dummy, cut additional pieces of PVC pipe or metal rods to the desired lengths for the legs.
3.2. Drill holes in the bottom of the main body of the dummy to attach the legs securely.
3.3. Insert the PVC pipe or metal rods into the holes and fasten them in place with screws or bolts.
4. Customize the Features (Optional):
4.1. If desired, add padding to the arms and legs of the dummy to create a padded striking surface.
4.2. Use paint or stain to add a finishing touch to your Wing Chun dummy, enhancing its appearance and protecting the wood from damage.
5. Mount the Dummy:
5.1. Once the construction is complete, mount the Wing Chun dummy on a sturdy stand or frame to ensure stability during training.
5.2. Adjust the height and angle of the dummy’s arms to suit your training preferences and body proportions.
6. Test and Adjust:
6.1. Before beginning your training regimen, take some time to test the functionality of the Wing Chun dummy.
6.2. Make any necessary adjustments to the height, angle, or tension of the arms to optimize your training experience.
7. Start Training:
7.1. With your Wing Chun dummy assembled and mounted, it’s time to start training!
7.2. Practice a variety of techniques, drills, and combinations to develop your skills and proficiency in Wing Chun.
Tips for Customization and Adjustments
Now that you’ve constructed your Wing Chun dummy, it’s time to customize it to fit your training style and preferences. Here are some tips for making adjustments and enhancements:
1. Arm Angle and Height Adjustment:
1.1. Experiment with different arm angles and heights to find the configuration that feels most comfortable and natural for your training.
1.2. The arms should be positioned at a height that allows you to practice strikes, blocks, and traps without straining your shoulders or arms.
2. Tension Adjustment:
2.1. If your Wing Chun dummy features spring-loaded arms, adjust the tension to increase or decrease the resistance when striking or deflecting.
2.2. Start with a moderate level of tension and gradually increase it as you become more comfortable with the movements.
3. Padding Thickness and Material:
3.1. Customize the padding thickness and material to provide the desired level of cushioning and shock absorption.
3.2. Thicker padding may offer more protection but could also reduce the realism of the training experience, so find the right balance for your needs.
4. Centerline Marker Visibility:
4.1. Ensure that the centerline marker on the main body of the dummy is clearly visible during training sessions.
4.2. Use contrasting colors or materials to make the centerline stand out, allowing you to maintain proper alignment and focus on targeting the centerline in your techniques.
5. Regular Maintenance:
5.1. Inspect your Wing Chun dummy regularly for any signs of wear or damage, such as loose screws or cracked wood.
5.2. Perform routine maintenance tasks such as tightening screws, sanding rough surfaces, and applying protective coatings to ensure the longevity of your dummy.
I have to regularly change nuts, bolts and springs around once every few years. If your strikes are improve every session, your dummy should be taking a solid beating over the course of use – so upgrades will be needed every now and then and if your dummy ain’t seeing any wear and tear – you aint training hard enough 😉

Maintenance and Care
To ensure that your Wing Chun dummy remains in optimal condition and continues to serve as an effective training tool, it’s essential to perform regular maintenance and care.
Follow these guidelines to keep your dummy in top shape:
1. Cleanliness:
1.1. Regularly dust off your Wing Chun dummy to remove any dirt, debris, or sweat that may accumulate during training sessions.
1.2. Use a soft cloth or brush to gently wipe down the surfaces of the dummy, paying special attention to the padded areas and joints.
2. Inspection:
2.1. Periodically inspect your Wing Chun dummy for any signs of wear, damage, or loose components.
2.2. Check the screws, bolts, and fasteners to ensure they are tight and secure, and replace any damaged or worn parts as needed.
3. Lubrication:
3.1. Apply lubricant to any moving parts or hinges on your Wing Chun dummy to ensure smooth operation and prevent rust or corrosion.
3.2. Be sure to use a lubricant that is compatible with the materials used in the construction of your dummy, such as silicone spray or machine oil.

Training Techniques with the Wing Chun Dummy
Now your up and running 🙂 heres a few of my favourite techniques with the wooden dummy. Nothing too advanced, just a few favourite basics:
1. Basic Striking Techniques:
1.1. Practice your straight punches (jab, cross) by striking the arms of the dummy with your fists, focusing on speed, accuracy, and follow-through.
1.2. Incorporate circular strikes (hooks, uppercuts) to target different angles and openings on the dummy’s arms.
2. Blocking and Deflecting:
2.1. Use the arms of the dummy to practice blocking and deflecting incoming strikes, focusing on timing and positioning to nullify the attack.
2.2. Experiment with different blocking techniques, such as the pak sau (slap block) and tan sau (palm-up block), to develop your defensive skills.
3. Trapping and Grappling:
3.1. Utilize the dummy’s arms to practice trapping and controlling your opponent’s limbs, simulating close-quarters combat scenarios.
3.2. Work on transitioning smoothly between trapping techniques and follow-up strikes to maintain pressure and control.
Conclusion
Congratulations! You’ve just learned how to make a Wing Chun dummy and explored a variety of training techniques to maximize its effectiveness in your martial arts practice.
Building and training with a Wing Chun dummy is a rewarding journey that can enhance your skills, improve your technique, and deepen your understanding of the art of Wing Chun.
just make sure you stay consistent.
Remember to stay patient, consistent, and open-minded. Rome wasn’t built in a day, and mastering Wing Chun takes time, dedication, and perseverance. Practice regularly, challenge yourself with new techniques and drills, and always strive for improvement in every aspect of your training.
its taken me years to learn the wing chun enough for it to bec ome second nature – but much like everything it takes time.
Above all, enjoy the process!
Remember, the only limits are the ones you impose on yourself. So, grab your dummy, step onto the training floor, and let the journey begin!
Keep training, keep learning, and keep striving for greatness.
Warren
Recommended Articles:

Jungle Scout Tutorial Amazon Private Label Product Research (22/1/2025)
Jungle Scout Tutorial: Mastering Amazon Private Label Product Research If you’re looking to break into Amazon FBA with private-label products, Jungle Scout is your ultimate companion. In this guide, we’ll walk you through a simple, actionable strategy to uncover profitable product opportunities, using criteria that have proven successful for sellers. Why Use Jungle Scout for…
7 Reasons Your Amazon Sales Are Dropping
If your Amazon sales are dropping, there’s a good chance your ad performance is the culprit. When budgets are tight, every penny counts, and poorly optimized ads can sink your sales faster than you think. But don’t worry—today, we’ll dive into 7 shocking reasons your sales are struggling, and trust me, some of these will…

Here’s How You Can Sell on Amazon While Working a Full-Time Job
Okay, let’s set the scene. You’ve got a full-time job that pays the bills but leaves you daydreaming about something more. You know, like sipping mojitos on a tropical beach while your bank account magically grows. 🍹 Here’s the good news: selling on Amazon is like setting up your very own lemonade stand, except Amazon…

Leave a comment